E-Z Clip, Cages, and Crimper Tool Instructions
|
Step 1: Cut the Hose
Cut the hose to proper length with an appropriate tool square to the hose length. Step 2: Slip on Two Clips
Install two proper sized clips onto the cut end of the hose. Orientation of the clips does not affect the performance of the connection. However, for ease of assembly, both clips should have the same orientation. NOTE: Failure to slide the clips over the hose at this time will require the clips to be stretched over the hose or fitting later. This may permanently damage the clip.
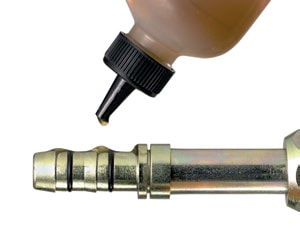
Step 3: Oil the Nipple
Lubricate the nipple with a generous amount of the refrigeration or A/C compressor lubricating oil. This MUST be done to lower the force of the nipple insertion. Step 4: Insert the Nipple into the Hose
Insert the nipple into the hose. To ensure that the nipple is fully inserted, check the gap between the cut end of the hose and the shoulder on the nipple. Care should be taken to avoid kinking or other damage to the hose during nipple insertion. NOTE: Be sure to wipe excess oil from the nipple and hose.
|
Step 5: Snap on the Cage
Snap the cage into the groove on the nipple. The arms should extend over the hose length. When the cage has been correctly installed in the cage groove, the cage will be able to rotate in the groove. This step MUST be performed to ensure:
A. The clips will be located over the o-rings on the nipple. B. The connection will be compatible with the connection’s pressure rating. Step 6: Slide the Clips
Slide the clips over the cage arms and into the channels on each arm. Step 7: Close the Clips
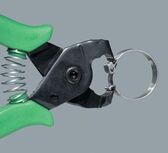
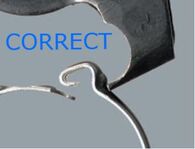
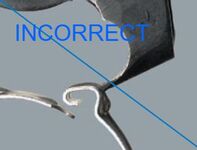
Use the E-Z Clip Crimper Tool (gpd #1023956). Position tool squarely on the clip connection points and should remain square during the closing of the clip. If the pliers are not kept square during closing of the clip, the clasp may have an offset. Use the pliers to correct the clasp alignment. Nose of the pliers should be firmly seated under the assembly bump and lock latch.
NOTE: 16 only, tap the top latch until fully seated. |
CLICK "DOWNLOAD FILE" FOR THE PDF VERSION.
| gpd_tech_tip_135-ez_clip-cages-crimper_tools-quick_reference.pdf |


